This article walks you through getting started with your new KickFire SPARK account, including essential steps like creating an account, creating and managing watchlists, and installing the tracking tag.
Create An Account
Create Watchlists
Manage Watchlists
Manage Email Preferences
Install Tracking Tag
Update Time Zone
Invite Users
How to Use the Reporting Tab
Create An Account
- Create an account at KickFire.com/signup and click on the account activation email.
- Log in to your KickFire account and select SPARK to continue.
Create Watchlists
- Click the Create Watchlist tab.
- Name your Watchlist.
- Enter the email addresses you like to receive the daily summary email and alerts.
- Upload or copy/paste your list of target account domains.
- Up to 250 domains can be added per watchlist.
- Enter one domain name per line without "www" or "https". Example:
abc.com
xyz.com
- Click Create.
Manage Watchlists
- On the Manage Watchlists tab, use the drop-down to select a Watchlist.
- To add a target account, type in the target account's domain and click Add.
- To delete a target account, click the orange trash can icon.
- To delete an entire watchlist, click [ Delete Watchlist ].
- On the Manage Watchlists tab, use the drop-down to select a Watchlist.
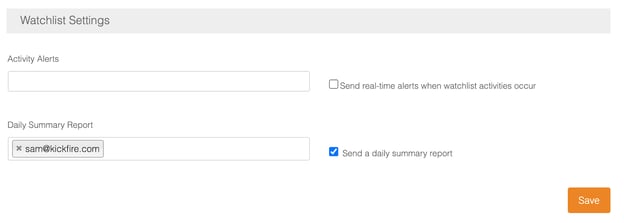
- To add an email recipient, type in the new recipient's email address.
- To delete an email recipient, click the grey X next to their email.
- Select which emails you would like to receive:
- Activity Alerts
Real-time email alerts notify you when a target account is actively engaged on your website. - Daily Summary Report
Daily email summarizing your target watchlists' activities for the previous day.
- Activity Alerts
- Click Save.

Install Tracking Tag
Once you've created a Watchlist, you'll receive a welcome email with your tracking tag and installation instructions. You can also access your tracking tag on the Settings tab.
- Copy the tracking tag.
Example: <script src='//spark.kickfire.com/spark.js?12345'></script> - Install the tracking tag in your website's global header/footer or tag manager.
- If your website utilizes Google Tag Manager, install the tag as Custom HTML and set the trigger for All Pages. Save and publish your changes.
Update Time Zone
- On the Settings tab, select your preferred Time Zone from the drop-down and click Save.
Invite Users
You can invite additional users from your company to create their own watchlists and track engagement of their target accounts using your existing KickFire SPARK tag.
- On the Invite Users tab, enter the new user's email address and click Invite.
NOTE: You must create at least one watchlist before inviting other users to join. - The new user will receive a unique link to create their own SPARK account and watchlists.
- Select Target Account Watchlist
From the drop-down menu, choose your target watchlist that you would like to view. - Accounts in Watchlist
Total number of target accounts on this watchlist. - Active Accounts
Number of actively engaged target accounts. - Invisible Pipeline™
Number of accounts that visited your website but are not on a watchlist.
To view these accounts, you'll need to subscribe to LIVE Leads or KickFire for Analytics. Contact us for a more information and a free trial. - Date Range
Select the date range to view the engagement analytics of your target account watchlist. - Engagement
Organize the report to find your most engaged accounts, based on total number of pageviews. - Search
Use the search bar to look up specific accounts and view their engagement. - Export
Enter your email to receive the report as a CSV file.